Showing posts with label tricks partition. Show all posts

EaseUS Disk Copy Home Edition 2.3.1

|0 comments
EaseUS Disk Copy is a 100% Safe Free Disk/Partition Copy Software. It is a perfect solution for free disk/partition clone for disaster recovery. EaseUS Disk Copy Home is a free disk/partition clone software for home users only. Regardless of your operating system, file system and partition scheme, through creating a bootable CD it can sector-by-sector copy you disk to assure you a 100% identical copy of the original one. It is a perfect free tool for Data Recovery Wizard to recover files from a backup disk.


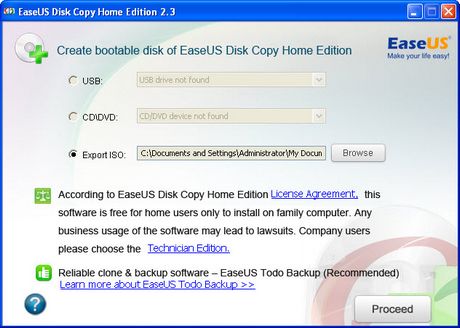
Burning Feature : With built-in burning feature, it can automatically create a bootable CD/DVD or USB disk to copy entire disk easily.
Disk copy: Clones one disk to another sector by sector with a bootable CD.
Sector by sector copy: Makes physical 1:1 copies (clones) of hard disks and partitions which ensure 100% identity to the original.

Partition copy: Copies one partition to another sector by sector with a bootable CD.
EaseUS Disk Copy Home is a potent freeware providing sector by sector disk/partition clone regardless of your operating system, file systems and partition scheme. The sector by sector method assures you a copy 100% identity to original. EaseUS Disk Copy can be used for copy, cloning, or upgrading your original small hard drive to a new larger drive. Simply speaking, it can copy anything from old hard drive including deleted, lost files and inaccessible data. So, the freeware is a perfect tool for Data Recovery Wizard to recover files from a backup disk. However, it cannot backup single file or folder, so reliable backup software - EaseUS Todo Backup with advanced features is recommended.


Key Features

  • It is a very safe and easy way to copy all or part of a hard drive to another hard drive with Disk Copy.
  • With built-in burning feature, it can automatically create a bootable CD/DVD or USB disk to copy entire disk easily.
  • Friendly graphical user interface.
  • Relay disk space for insufficient destination.
  • Support hard disks up to 1 TB.


Free Partition Software for USB hard drive Partition

|0 comments
While creating hard disk partition is easy and can be done using any partition manager tool, but how to create partition in your USB Drive. As the price of USB hard drive is falling continuously and demand for more hard disk storage is growing, people now tend to buy a USB hard drive for convenience, while how to manage the USB hard drive becomes a big problem.

To optimize the performance of your USB hard drive, a third party application is needed. EaseUS Partition Master Home Edition, a freeware to manage partition, works as a powerful and magic partition software. With this partition freeware, one can enjoy a wonderful experience of managing your partition like a magic, such as Resizing, Copying, Merging, Creating, Deleting partitions and so on. Especially you can enjoy extend NTFS system partition without reboot and Dynamic Disk Copy.
There are lot of tools that can be used to create partitions, some are free and some are not. EASEUS Partition Master Home Edition is totally free for home users with USB hard drive supported.

This partition freeware works perfectly with hardware RAID and Windows 2000/XP/Vista/Windows 7 32/64 bit Operating Systems. Moreover, with user-friendly interface, you can partition your USB hard drive with very simple operations. So no matter if you are computer expert or not you can perform USB hard drive partition easily. The most shining point of this freeware is that your data is completely protected during the process of partitioning your USB hard drive.

How to partition USB hard drive by this freeware:

1. Launch EaseUS Partition Master.

2. Select the hard disk partition to be resized and click Partitions > Resize/Move partition.

3. On the disk map, current size of the partition is displayed on the top of the dialog box. The map also depicts the used and unused space within the partition and the free space surrounding the partition (if any exists). The minimum and maximum sizes that you can resize a partition appear below the map.

4. Position the mouse pointer on the left or right partition handle.

5. The mouse pointer changes to a double-headed arrow.

6. Drag the handle to the partition size you want.

7. Click OK. And you have done it.


The tool is free only for the Home users which can be downloaded from the link below.

Create or resize partition using Aomei Partition Assistant Home Edition in Windows 8

|0 comments
Planning to shrink large hard drive into small one, but you can not find any good, reliable Partition Manager software. Do not worry, we have the best free Partition Manager software for Windows. While many may prefer to use the in-built Disk Management Tool, there are some who may want to use a third-party software offering more features. 

This hard disk partition manager has the ability to resize and move partition, extend system drive, merge partitions, copy partition and allocate free space. It includes a built-in Extend Partition Wizard that assists you to extend system partition without rebooting.
This is a freeware that will let you carry out the following tasks:

1. Resize Partition - "Extend Volume" and "Shrink Volume" to modify partition size by yourself

2. Create Partition - Create more partitions for different usages even there’s no unallocated space

3. Move Partition - Reset the location of one partition

4. Merge Partitions - Merge two adjacent partitions into one

5. Split Partition - Quick split one big partition into two small partitions.

6. Allocate Free Space - Allocate free space from one partition to another for making the best use of disk space.

7. Easy Copy Wizard - Copy partition or migrate entire hard disk to another without Windows reinstallation

Like most others, it is compatible with both 32 bit & 64 bit versions of Windows operating systems, including Windows 8, Windows 7 (SP1 supported), Vista, XP, and Windows 2000 Professional.

Download MiniTool Partition Wizard Home Edition for Windows 8

|0 comments
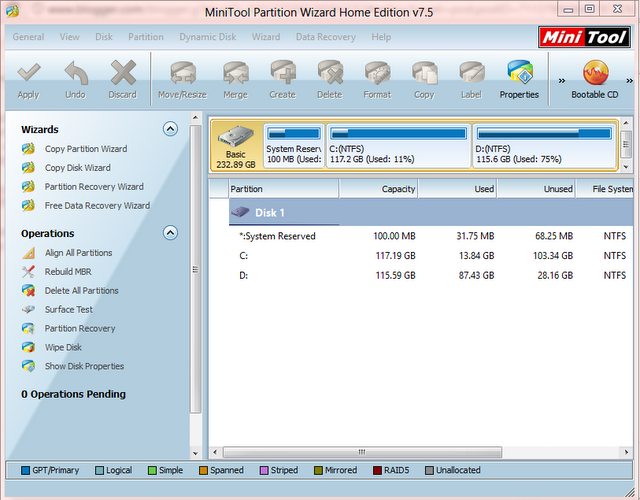
When microsoft has released Windows Vista then he has made a inbuilt tool which can create partition or resize existing partition without loss of data. After than microsoft has continued this tool in Windows 7 and Windows 8 also. But this inbuilt tool is not so good as as other tool which is available on the internet. So, we are writing about this new new tool which will help you if you have already installed Windows 8 on a new machine and looking for a good software to partition the hard drive. MiniTool Partition Wizard Home Edition v7.5 is the best solution if you are looking for a free tool to resize existing partition or want to create a new partition. MiniTool Partition Wizard Home Edition v7.5 works with Windows XP, 2000 Professional, Vista SP2, Windows 7 SP1 and Windows 8 (all editions, 32 bit and 64 bit).
In addition to the create, delete, format and copy partitions, it includes other options for power users also. There are options such as set label for the partition, align partition to improve disk performance, check file system for errors, hide partition, change partition serial number, change partition type ID, check partition for bad sectors, wipe partition, etc.
One other great feature of this MiniTool is that it includes partition recovery wizard also, which will help you to recover lost or deleted partitions in a few steps and also supports partition size upto larger than 2 TB.

The best thing about this software is that it is so easy to use. Just launch the program, select a partition to see all partition related options in the left side of the window. Right-clicking on a partition will also display all options. Advanced tasks can be found under file menus.

Download MiniTool Partition Wizard Home Edition

How to create or re-size partition in windows vista or Windows 7

|0 comments
Today, I will guide you through the procedures for making a partition on your computer/laptops without any third party software in windows vista and windows 7. Just follow the procedure and I’m 100% sure that you will be able to do it as i explained it below step by step :-

Note : Before going through this procedure make sure that you have sufficient battery backup is available, otherwise you may loss your data. So Be careful before proceeding to the next step.

Go to the ‘start-menu’, hover your mouse over ‘computer’. Right-click on it and click on ‘manage’.        

Note: If you do not have ‘administrative rights’ or your account is limited. If so, then you will not be able to make a partition. So make sure that you have ‘administrative rights’    

If you find a window popping up asking for ‘YES’ or ‘NO’. Click on ‘YES’.  The ‘Computer Management’ window will open. In there, you will find ‘Storage’. Under that you will be able to see ‘Disk Management’ thus click on it.   
Note: It should take about 10 seconds to load, if it takes lot of time then immediately close the computer management or restart the computer and start over from step 1.   So when the ‘Disk Management’ window opens you will see there is 1 drive i.e. C-drive or another one before the C-drive called ‘system reserved’DO NOT do anything on the ‘system reserved drive’.   

Now you could either create partition on ‘C-drive’ or if any other drive available then you can do on other drive also. You can do this to any drive you want. Of course, depending on the space availability on your computer/laptop. I am using E-drive to demonstrate the procedure.    Right-click on the drive you want to create partition, in my case it is E-drive. A pop-up should come up, click on ‘Shrink Volume’.   Note: If you have a big hard-drive, it would take longer time. For instance, if your hard-drive is 1TB it can take up to 20 minutes. In case, it says ‘NOT RESPONDING’ don’t worry. Just be patient as it will respond.   Once the loading is done, a window should pop up. In here you can allocate what size your new drive will be. This completely depends on you. Under ‘Enter the amount of space to shrink’ you have to allocate the size.   

Note: The allocation of size should be done in ‘Megabytes’ only. For instance, if you want to put 10 Gb, you could write it as 10024 Mb = 10 Gb and if in one digit like 8gb then write it as 8024 Mb = 8 Gb.  Then click on shrink.  Note: This will take time depending on what size you have allocated.      Once it is done, you will find a new slot. Usually it is placed after the drive that you partitioned. The partition drive will show a ‘black bar’. Right-click on the drive with the black bar, a window should pop-up. Just follow the procedure. Keep clicking ‘NEXT’ until you find the bit where it says ‘Assign the following drive letter’. You could just leave it as it is or give any letter you want and then click 'Next'. On the next window just name the volume and make sure ‘perform a quick format’ box is checked. If you un-check it, then the procedure would be very long and leave the other bits as it is. After checking everything and then click 'Next' & then 'Finish'1   Wait for a bit and your new drive will be created. So close everything up and go to my computer &and you should see your new drive ready for you to use. :DI hope 'YOU' have followed the procedure. Any problem do not hesitate to ask a question. I would answer you as soon as possible!


Share