Showing posts with label Tricks Windows. Show all posts

Image Scanner for Windows 8, Windows 7

|1 comments

Scanning an image from a Scanner can be really useful especially when you are equipped with Windows 8, Windows 7, XP or Windows Vista, the software utility Image Resizer / Scanner can be a really handy utility to do the scanning. In order to scan an image all you need to do is launch the software and click on the scan button. Irrespective of the scanning hardware you have got connected to your computer, the software presented here can be used to quickly scan, store and save the scanned images to jpg, bmp, png or even gif file formats.
Image Scanner does not only scan your documents but it can convert into different image format like : JPG, Gif, PNG etc in different desired Width. Download the Image Resizer Software from the link which is given at the end of the article, install it on your Windows 8, Windows 7, Windows Vista or Windows XP. After the installation just launch the programme and in case you do have the appropriate Scanner Drivers installed, all you need to do to start the image scanning is click on the Scan Now button and then follow prompts. Depending on the Scanner, you will get the appropriate graphical user interface to continue the scanning. In case you would like to select one of the available scanners, click on the Select Image Source button and select the appropriate Scanner, Webcam, etc. Yes, it works with Webcam also. This might work with a Digital Camera however, the software has not been tested yet with a Digital Camera.The Image Scanning software has been tested on Windows 8, Windows 7, and Windows Vista, Windows XP and works well with both 32 and 64 bit versions.

Enable or Disable Hibernation in Windows with Microsoft Fix It

|0 comments
Hibernation feature of Windows is very good as it allows us to save the exact state of our computer and resume from there without consuming any electricity. The biggest difference between sleep and hibernation is that when you make a PC sleep, it consumes some electricity (although very low) whereas this is not the case with hibernation.

When one's computer hibernates, it saves the exact image of his system on  hard drive and makes use of the system memory for faster login. If you will check out the hidden and protected operating system files in your installation drive, you will see a file called Hiberfil.sys in your operating system. This file is used for saving the system state when your system is hibernated and you will also see that its size is approximately equal to your installed RAM size.
Users who have disabled the hibernation features in your system then this file will be not present. You can manually enable or disable the hibernation option in your system by visiting the control panel or follow the below steps:

1. Open command prompt and ensure to run as Administrator power.
2. Type powercfg.exe /hibernate off (to turn Hibernation Off) or powercfg.exe /hibernate on (to turn Hibernation On).
3. Now exit

Users who are not comfortable working on commands, then you can also make use of automatic script from Microsoft that will do this for you. With the help of Microsoft Fix It, you can both enable and disable the hibernation in your system.

Just visit the link below, and you will get to know how to get this done automatically.

Delete Folders and Files from Any Location at Once with Deletist

|0 comments
After taking too much care in my computer has so many files and folders are still duplicate and consuming extra space in my hard disk which can not be avoided. Organizing them is very difficult and a time consuming process. We have to do it manually one by one is very painful task. Hence, we have downloaded a tool that can help me in this situation called as Deletist.

With the help of tool Deletist, one can delete any number of files and folders from anywhere inside the computer simultaneously without visiting the actual location on his pc. One have to just feed in a text file with the location of the files and folders to be deleted, and clicking the Delete button will erase them at once.

The another great thing about thing tool is even if you will drag and drop the text file on to the program window, the locations will get auto populate and in case there are some spaces in the text file, then clicking the Warning symbol (yellow triangular one) will remove all those so that the deletion process goes smooth. Other function is in this tool is that, if one does not want to take any risk while deleting the data, user can select the option of “Delete to Recycle Bin”. Now the files will go to Recycle Bin instead of permanent deletion.
This small tool has been designed for windows computer and more ever this is portable software, hence one can use by keeping this tool in an usb drive also. Just go ahead and download this portable tool from the official link which is provided below.

How to enable and disable UAC of Windows 8 : TweakUAC

|0 comments
Users who have already used Windows 7 or Vista is familiar about UAC. UAC stands for User Account Control. When you try to run any programme on Windows 8, 7 or Vista it asks for permission. It is very good for security purposes, but what you will do if you want to disable UAC. It is some more difficult to disable UAC in Windows 8, hence we are providing a guide.

Steps to Disable UAC :

First Method :

1. Open computer.

2. Here, click on Open Control Panel.

3. Here, click on "User Accounts and Family Safety".
4. Here, click on "User Accounts".
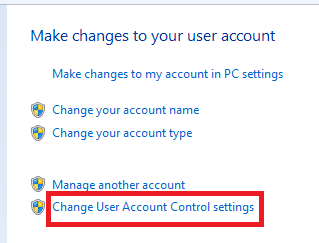
5. Click on "Change User Account Control Settings".
6. If it prompts for UAC then click on Yes.

7. Now its will open "User Account Control Settings".
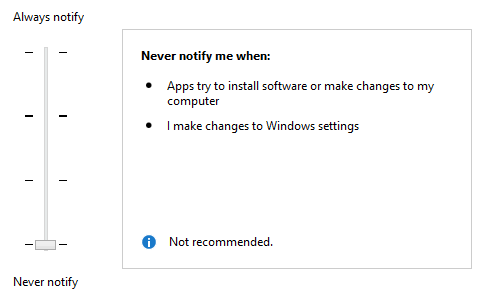
8. On the left side drag the notification bar up to Never notify and click on OK.
If explorer prompts for UAC then just click on OK. It may ask to you for restart to take effect. Now you have done.

Second Method :

If you do not want to go through a big process then you can disable or enable UAC with a little tool also. This tool name TweakUAC. It gives you more control of UAC settings in Windows Vista, 7 and 8. It works in 32 Bit and 64 Bit also. In addition to enabling or disabling the UAC, TweakUAC also allows you to select the “quiet” mode for UAC. In “quiet” mode, the security of UAC is fully enabled, except that if you use Windows as an administrator, you will not see the usual UAC prompts to approve actions that require the administrative rights.

Download WinOwnership - The Safe Windows File Replacement Tool

|0 comments
Taking ownership of a system file in Windows 8, 7 and Vista is a very difficult task. You have to go through so many processes. System files in these operating system are very securely protected. Hence, WinOwnership is a handy tool which will help you in the Windows files and directories, enabling and disabling the system file protection. WinOwnership will help you in take ownership with files and directories, removing and restoring the system file protection without  touching on the protections of file or folder.
Features of WinOwnsership

  •  One click to make full access with the file
  •  Metro interface based on Windows 8 compatible with Windows XP
  •  One click to restore the default Windows file ACL Protection
  •  Not touch on default system ACL Protection, the file after undo will shows the same protection
  •  Full file access with an new file ACL Replacement
  •  Using an new ACL Backup / Restore patch technology
  •  Not use any core Windows Resource to patch the file
  •  The file isn't patched, only the protection area, can restore with an "Undo" click
  •  The user can rename the unprotected file if is being used, with an possible patch with other file
  •  Support for all files types
  •  Can work with Windows core files
  •  Can work with directories
  •  Can work with ACL protected files
  •  Multi threaded modules
  •  Fast and light interface
  •  Full ACL kernel lock / unlock
  •  Works with multi items
  •  Multi CRC hash check
It is compatible with Windows 8, Windows 7, Windows Vista, Windows XP Family,Windows Server 2003 / 2008 / 2011 Family. including 64Bit. For installation it requires  .NET Framework v4.0.


Share