Users who have already used Windows 7 or Vista is familiar about UAC. UAC stands for User Account Control. When you try to run any programme on Windows 8, 7 or Vista it asks for permission. It is very good for security purposes, but what you will do if you want to disable UAC. It is some more difficult to disable UAC in Windows 8, hence we are providing a guide.
Steps to Disable UAC :
First Method :
1. Open computer.
2. Here, click on Open Control Panel.
3. Here, click on "User Accounts and Family Safety".
4. Here, click on "User Accounts".
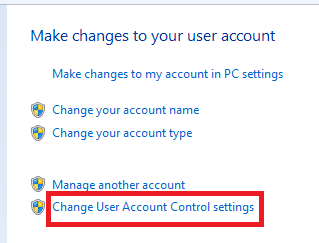
5. Click on "Change User Account Control Settings".
6. If it prompts for UAC then click on Yes.
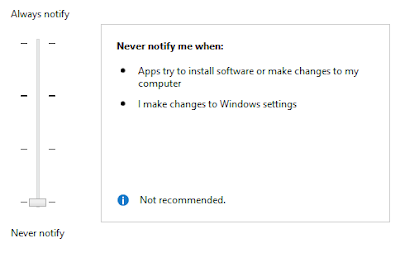
7. Now its will open "User Account Control Settings".
8. On the left side drag the notification bar up to Never notify and click on OK.
If explorer prompts for UAC then just click on OK. It may ask to you for restart to take effect. Now you have done.
Second Method :
If you do not want to go through a big process then you can disable or enable UAC with a little tool also. This tool name TweakUAC. It gives you more control of UAC settings in Windows Vista, 7 and 8. It works in 32 Bit and 64 Bit also. In addition to enabling or disabling the UAC, TweakUAC also allows you to select the “quiet” mode for UAC. In “quiet” mode, the security of UAC is fully enabled, except that if you use Windows as an administrator, you will not see the usual UAC prompts to approve actions that require the administrative rights.


0 comments:
Post a Comment